Sunday, September 23, 2012

I Can Make That


I've often thought this phrase when surfing the internet (specifically Pinterest) or shopping in a store (particularly Home Goods -- I love that place). Every time I think "I can make that" about a certain item of home decor or clothing, I tend to consider it a challenge. I like to be challenged -- I think it stretches our minds and keeps us young (because I'm so old... right.) Not only that, it allows us to get creative. The craft project or new fashion accessory may not turn out exactly how the photo looks, but in the end it is made by us and it is our own (or an awesome new gift for a friend). I speak as a crafter and hard-core DIYer. I've also recently delve into the world of sewing. What will my fiance do with me? It's getting ridiculous -- ridiculously awesome in my mind. I love crafting. That phrase is so cliche, but if it's true there's nothing wrong with that, right? I truly do, though. Maybe it's the aspect that it really is a challenge for me -- creating a piece and then bam, I can hang it in my house or wear it out in public. What's even better is when someone comments like, "oh that's really neat" and you can say, "I made that." Yeah -- I think that's a major part of it too. Being crafty and 'artsy' is becoming a valuable talent in today's Pinterest and blogging realms. The arts are making a comeback! I guess we will just have to see if this is a real movement or simply a temporary fad. I'm curious. Either way, I think I'll always be a crafter and DIYer. I like saving money and doing things myself -- which is pretty much the epitome of DIY. What can I say? I enjoy keeping the craft and home decor stores in business. 

Enjoy the weather! After all, it is finally Autumn.

To check out the tutorial I used for my most recent crafting endeavor, click here.

Wednesday, August 22, 2012

The BEST Bran Muffins

I absolutely love these muffins. My FMIL introduced me to the recipe. It's a good day when there are bran muffins in the house! I couldn't help but share the glory of these muffins, so here's the recipe. These are great for breakfast, so I decided to make them this morning. My fiance loves them too, so it's an all-around win! :)

To begin, get your ingredients together. You're going to need bran, buttermilk, whole wheat flour, baking soda, brown sugar, cinnamon, cloves, an egg, oil, and raisins (optional). 
Then, preheat your oven for 375.

Start by combining one cup buttermilk and 1 cup bran. If you don't have buttermilk (I don't just have buttermilk on hand), you can make a substitute that works just fine. If you have lemon juice or vinegar, you can add one tablespoon of that to one cup of regular milk. Let is stand for about five minutes and voila! You have a perfectly good buttermilk substitute. 


Once your buttermilk is made, add it to the bran. Set it aside and work on the dry ingredients.


Add the flour, baking soda, brown sugar, cinnamon, and cloves to your mixing bowl. Mix it all up.


Make a well in the center (anyone know why they do this?) and add your wet ingredients, including the buttermilk/bran mixture.


Do some more mixing until it's pretty well combined.


Pour the batter into muffin liners in a muffin tin. Fill them about half way.
Pop 'em in the oven for about 15 minutes.


Ta da! Glorious, warm bran muffins for breakfast. :)


I can't say enough about how much I love these muffins! :) They aren't super sweet and they're very filling. 
I love them. Special thanks to my FMIL, Karla, for sharing the recipe.


And..... Here's the recipe for your C&Ping convenience!

------------------------------------------------------

Bran Muffins
Makes 12 Muffins
Preheat oven 375

Ingredients:
1 C bran
1 C buttermilk (see substitute)
1 C whole wheat flour
1 tsp baking soda
1/2 C brown sugar
1 t cinnamon
1/4 t cloves
1 egg
3 T oil
1/2 C raisins (optional)

Directions:
Combine bran and buttermilk, let stand. Mix dry ingredients. Make a well in the center and add liquid ingredients and bran/buttermilk. Mix well. Using tin liners, fill each muffin tin half full. Bake at 375 for 15 minutes. Enjoy!

Buttermilk substitute:
Add 1 T lemon juice or vinegar to 1 C milk, let stand approximately 5 minutes.

-------------------------------------------------------
Hope your day is wonderful!

Saturday, August 11, 2012

Peacock Sunglasses and Worry


Well... at least that's what I like to call them. It's not too often I do some serious shopping. My wardrobe consists of a couple of summer dresses, jeans, flip flops, and various blouses (a large majority of them are black - I'm a photographer, what can I say?). Because of my lack of designer-wear, a common person might say I could benefit from a serious shopping spree. I don't absolutely love going shopping like the typical female though. Cute clothing isn't an important part of getting ready in the morning for me. I shouldn't worry about what new designer jeans I'm going to buy, or getting the cute shoes I saw in the store window. 
I will admit -- it's hard not to. 
So often we are bombarded as a people with messages that we are not good enough. Our clothes don't fit the best, we aren't spending enough money on our handbags, our makeup isn't top quality.
Ranting about my new peacock sunglasses and clothes in general reminded me of several verses I read awhile back found in Matthew 6. The Lord reminds us "do not worry." Not about food, drink, or clothing. He reminds us that he has dressed the lilies of the field in their beauty -- will he not dress me, his daughter, in such splendor? Although the Lord does not literally pick out my clothes each morning and put them on my body, it is an excellent reminder that He will provide for me just as he cares for the flowers. He has up to this point, and I have faith that he will continue to.
31“So don’t worry about these things, saying, ‘What will we eat? What will we drink? What will we wear?’ 32These things dominate the thoughts of unbelievers, but your heavenly Father already knows all your needs. 33Seek the Kingdom of God above all else, and live righteously, and he will give you everything you need.
"Seek the Kingdom of God above all else, and live righteously, and he will give you everything you need." Holy cow. Just reading this verse kindles a flame in my soul that I can literally feel. What power in such words! Recently, Ethan and I have been doing some planning for our near future -- aka apartment hunting. Talk about good timing. Who knew that a pair of new sunglasses I saw in the store today could lead me to a verse that rekindles my hope in our future and assures me that good things will come when we follow Christ! It is things like this that remind me that I am not alone and that our God is SO good.

Matthew 6:19-34 NLT
19“Don’t store up treasures here on earth, where moths eat them and rust destroys them, and where thieves break in and steal. 20Store your treasures in heaven, where moths and rust cannot destroy, and thieves do not break in and steal. 21Wherever your treasure is, there the desires of your heart will also be.
22“Your eye is a lamp that provides light for your body. When your eye is good, your whole body is filled with light. 23But when your eye is bad, your whole body is filled with darkness. And if the light you think you have is actually darkness, how deep that darkness is!
24“No one can serve two masters. For you will hate one and love the other; you will be devoted to one and despise the other. You cannot serve both God and money.
25“That is why I tell you not to worry about everyday life—whether you have enough food and drink, or enough clothes to wear. Isn’t life more than food, and your body more than clothing? 26Look at the birds. They don’t plant or harvest or store food in barns, for your heavenly Father feeds them. And aren’t you far more valuable to him than they are? 27Can all your worries add a single moment to your life?
28“And why worry about your clothing? Look at the lilies of the field and how they grow. They don’t work or make their clothing, 29yet Solomon in all his glory was not dressed as beautifully as they are. 30And if God cares so wonderfully for wildflowers that are here today and thrown into the fire tomorrow, he will certainly care for you. Why do you have so little faith?
31“So don’t worry about these things, saying, ‘What will we eat? What will we drink? What will we wear?’ 32These things dominate the thoughts of unbelievers, but your heavenly Father already knows all your needs. 33Seek the Kingdom of God above all else, and live righteously, and he will give you everything you need.
34“So don’t worry about tomorrow, for tomorrow will bring its own worries. Today’s trouble is enough for today

Thursday, August 9, 2012

Chocolate Mug Cake

Ethan and I will be moving into our apartment in December after we get married on the 15th (Yay!) so I have been slowly collecting recipes that I can make for both of us. For Christmas last year, one of the gifts I received was a cute recipe box -- what more of a reason do I need to fill it with delicious recipes that I will (hopefully) one day try out! While browsing on Pinterest for said recipes, I came across a blog that had several single-serving "mug" recipes. French toast, apple crisp, chocolate chip cookie, and get this... molten brownie! Needless to say, I copy and pasted every one of the them to put in my box. 

Today I tried out the chocolate cake recipe. Although it needs a couple of modifications in my opinion, there is potential. 


IMAG0286.jpg

Chocolate Mug Cake


INGREDIENTS
1 tablespoon plus 2 tsp cocoa powder
3 tablespoons spelt flour (or white, or even peanut flour)
1/8 tsp salt
2 tsp sugar (pr evaporated cane juice)
1/4 tsp baking powder
1 stevia packet (or 1 tablespoon more sugar)
2-3 tsp coconut oil or vegetable oil (sub applesauce or mashed banana)
3 tablespoons milk of choice 
1/2 tsp pure vanilla extract

DIRECTIONS
Combine dry ingredients and mix very, very well. Add liquid, stir, then transfer to a little dish, ramekin, or even a coffee mug. Microwave 30-40 seconds. If you don’t want to eat it straight out of the dish, be sure to spray your dish first (and then wait for it to cool before trying to remove it).

NUTRITIONAL FACTS
Calories: 205 with oil (or 140 without)
Fat: 12g with oil (or 2g without)
Carbs: 30g
Fiber: 6.5g
Protein: 5.5g
ww points (new system): 6 (or 4 without oil)


A couple of personal notes:

I used banana instead of oil for a "healthier" alternative. (Only 140 calories without the oil! -- but... you may want to stick with the oil.) The banana taste is definitely prevalent. If you think you can handle the banana taste and texture, more power to ya, just make sure you mix it VERY well.
I also used whole wheat flour. This may affect the taste as well. 
Also, I had to microwave it for 30 more seconds after the 40 seconds, so you may need more heating. Try thirty second intervals until you think it's the right consistency. 

Overall, this recipe will need some trial and error attempts, but eventually I think could be a winner in my book (or box).

Wednesday, August 1, 2012

DIY Hydrangea Wedding Bouquet

This is my bouquet that I made from a tutorial you can find here. I added a few details to it to make it my own. It was overall really simple! I love the consistent color and the rustic feel of the stem. Special thanks to Jaimee Morse for this gorgeous DIY bouquet!


Friday, July 27, 2012

DIY Nosegay Bouquet

You could definitely call me a DIY bride. A huge portion of our wedding decor and necessities I've made myself. We are making our StD's, invitations, the wedding decor, an alter backdrop, more wedding decorations, my garter, the bouquets (mine, toss, and bridesmaids), boutonnieres, ring bearer pillow, and did I mention wedding decorations? Needless to say, we've had time to do all of this. Ethan and I were engaged December 15th of last year (our four year dating anniversary... oooo) and we'll be married December 15th of this year (five years!). There's been so much prep, but let me tell you, this is one exciting and stressful time of life. If you ever plan to get married, I recommend experiencing wedding prep, just for the fun of it. ;)

So! Last night I was working on bridesmaid bouquets. Our "theme" per se, is burlap and lace. We have a lot of rustic decor such as old skeleton keys, mason jars and burlap out the you-know-what. My bouquet is from a tutorial I found on Pinterest. The bridesmaid bouquets I made as I went. I had an idea of what I wanted and went with it. I took a lot of pictures to share so check it out!

DIY Nosegay Bridesmaid Bouquet


Supplies
- Two hydrangea stems (I got mine at Michaels)
- Floral tape
- Scotch tape
- Muslin
- Burlap
- Twine
- Buttons
- Hot glue gun
- Wire cutters
- Pliers
-Ruler

I started by stripping the hydrangeas of the leaves and extra protruding stems. These can get in the way. Next, secure the hydrangea stems together. I used Ashland floral stems because they were a better quality. These were the same ones I used for my bouquet as well.


The kind that I chose have a slight bend in the stem. This was an easy fix. 


Simply use your pliers and bend the stem strait. There's wire inside that allows you to do this. If you don't fix the bend, your stems won't fit easily together.


After I fixed the big bend in the stem, I created a smaller one close to the head of the flower. This helps create the round look of the bouquet. When you put both of your stems together, they should form a round dome. If there are open spots, move the blooms around to fill them in.

Next, I wanted to secure my stems together. A little scotch tape did the trick. This made it easier to wrap the stems in floral tape because it helped them stay together.


Wrap your stems in floral tape. Next, you should figure out how long you want your bouquet. Ideally, you should be able to comfortably place both hands on the bouquet. My stems were about 8 inches long from the head of the flower.


My next step was to add more stems to the bouquet. This helped give it a bigger, more solid feel. Using the part of the stems that I cut from my flowers, I cut them to 8 inches and secured them with more floral tape. 


After you're happy with the feel of your nosegay bouquet, it's time to decorate it. I used some extra muslin I had to wrap the stem. I secured the muslin with hot glue.


After that, I wrapped the stem in burlap. Burlap is somewhat see-through, so the muslin helped. Secure with hot glue. (I love hot glue.)


At this point, the possibilities are pretty much endless. You can wrap with twine (like I did), and secure with buttons. Add ribbon, charms, whatever suits your fancy. :)


Finished! I have two down, three to go. Whew!

Thanks for stopping by today!

Canon Kind-a Girl

My favorite time of the day to photograph in the summer is about 8 o'clock. The sun is just meeting the horizon and I can get some really good sun flare (when I want it). I've been in photography for about a year and a half now, a growing portion of my 19 years of life on this earth. Every time I pick up my SLR I find that I learn something new. It's a constant process of trial and error to pinpoint my individual style and the desired outcome of my photos.
I'm a Canon kind-a girl. I will admit that I've never truly ventured into Nikon or any other DSLR brand. I've fuddled over my cousin's Nikon in attempts to assist her in figuring out the device, but other than that, I've  quite literally never touched the brand. Do I have a desire to? Maybe -- just for curiosity's sake.
I recently purchased a Canon 65mm fixed. Playing around with it, I've noticed the benefits of having such a lens. You really can stand across the room and catch a conversation between a bride and groom without attracting their notice. I can photograph the bride donning her dress with her maids surrounding her and not interrupt that special moment. Needless to say, it's an awesome lens for the price tag.
Am I a high end photographer with thousands upon thousands in equipment? Absolutely not. But I love what I do and I am confident that shows through my photos. That is the important thing. To view my passion, check out my page. See you around!


Thursday, July 26, 2012

Favorite Banana Bread


I love getting new recipes from other people. This one is from my future MIL and I've made it twice -- It is so good! Ethan and I love bananas and so we have them around a lot. We'll buy a ton, indulge on them for a couple of days and be so sick of them afterward. What to do with rotting bananas? Banana bread of course! I wasn't able to get a photo of the full loaf because we cut into it so fast. Yum!


Favorite Banana Bread

1 8 oz. cream cheese
1 c. sugar
¼ c. margarine
1 c. mashed banana
2 eggs
2 ¼ c. flour
1 ½ tsp baking power
½ tsp baking soda
1 tsp cinnamon
¼ tsp cloves
Mix first 3 ingredients. Blend in next 2. Add remaining ingredients. Pour into loaf pan, greased and floured. Bake at 350 for 1 hr 10 min. 

Wednesday, July 25, 2012

Taco Soup!

I love this recipe. I found it online in my search for easy peasy dinner recipes. I made a couple variations to make it easier and Ethan loves it. It's so quick and simple. Sounds like a thumbs up to me! I like to pair it with some Jiffy corn bread or saltine crackers. It's pretty much the best rainy day, souper filling meal out there. (Souper.. ahaha... I crack myself up.) On to the recipe!

Donnaven's Easy Peasy Taco Soup

1 lb ground beef (we use venison -- your preference)
1/4 diced onion
1 can diced tomatoes
1 can mild rotel
1 can chili beans
1 can black beans
1 can whole kernel corn
2 cups water
Approx. 1 1/2 tbs taco seasoning (We make our own -- view the recipe here!)

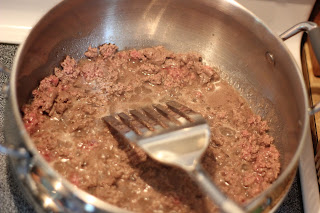
Put ground meat and a little bit of water in a relatively large pot -- big enough for a batch of soup. Turn on the heat and brown that sucker.


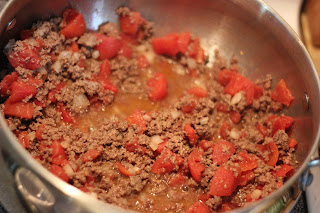
Once the meat is browned, add diced onion. Saute the onion until it's nice and cooked. Add the can of tomatoes. Don't drain them!
By now it should look something like this.


I usually add rotel at this point, but we didn't have any in stock. No worries, it'll still be tasty.
Sooo.. moving on to the next step!
Now you're going to add the undrained beans and corn. I love beans.


Stir it up really good! 


Now add the water and taco seasoning and turn your heat to medium low. It should simmer for about 15 minutes. Be patient.


Tada!! 
We put ours over brown rice and top it with cheese and it is DELICIOUS! Enjoy!


Here's the c&p version for your convenience. :)

Donnaven's Easy Peasy Taco Soup

1 lb ground beef (we use venison -- your preference)
1/4 diced onion
1 can diced tomatoes
1 can mild rotel
1 can chili beans
1 can black beans
1 can whole kernel corn
2 cups water
Approx. 1 1/2 tbs taco seasoning (We make our own -- view the recipe here!)


Brown meat in a large pot. Add onions and saute. Next, add tomatoes and rotel. Add undrained black beans, chili beans, and corn. Stir. Add taco seasoning and water. Let simmer for 15 minutes and serve warm with corn bread.


Homemade Taco Seasoning

Out of taco seasoning? No worries. Homemade taco seasoning is super easy to make and stores really well. Here's the recipe we use!

Homemade Taco Seasoning

2 T chili powder
4 t garlic powder
4 t onion powder
1/2 t pepper flakes
2 t oregano
4 t paprika
6 t cumin (I love cumin...)
1 t cornstarch

Put it all together in a glass jar with a lid (we use mason jars) and set it aside for later use. 1 tbsp is good per 1 lb of ground meat, but I like to use more. You can also adjust the spiciness of this seasoning by adding more chili powder. This starter is not spicy at all, in my opinion. You can also make bulk taco seasoning by just double or tripling the recipe. Like I said, no worries!

What's in a Name?

All of my life I have been named Donnaven. There is no nickname to shorten it to, no way to make it more feminine, and I sure as heck would get a lot of grief if I tried to change it. (And yes, I refuse to change it to Donna. I know a few of those.) So, I'm stuck. Embrace it -- that's what I'm told. Have you ever met a woman named Donnaven? Spelled exactly the same way? Doubt it.
Curious about the origins of my name, I went on a quest. I will never find the name Donnaven spelled exactly the same way as mine, so I settled on the closest spelling. What did I find? Donnaven means dark haired chieftain or warrior. A boys name. Gaelic or Irish origin. But behind the name, there is so much more. That's why I'm here. My quest of "defining Donnaven" continues.
Here we go.
Hello! My name's Donnaven, pleasure to meet you. I'm a full-time student, part-time waitress, "eccentric," hardworking, stubborn and all around an unique individual (excuse the double standard) who loves to create, try new things, and cook. I'm due to be married December 15th of this year and I plan to overwhelm you with DIY wedding ideas, new recipes, my very recent sewing excursions, and my love of photography. Glad to have you!